Technical SEO is the practice of optimizing a website’s technical aspects to improve its visibility, ranking, and overall success in search engines. The objective of Technical SEO is to make sure that your website is easily discoverable and accessible to search engines so that they can understand its content and provide relevant results to users. Read more
Webpack is actually the best tool to create web pages. Is the next generation tool after gulp and grunt. For me is really easy to configure and manage and I want to show you how I can make projects with this tool.
Prerequisites
First of all, we need nodes running on our machines. Open terminal or command line and try if you have installed node.js:
|
1 |
$ node -v |
if you have installed you see the version of node, if not you need to install it, we have a little post explaining how to install:
You can clone the finished project from GitHub for reference: Github EBAVS/ Webpack ES6 tutorial
Configure Project
Now we need to initialize and configure the basics. Create a project folder on your computer and enter.
Initialise Project
First, we need the basics. We work with nodes and this tool uses a file called package.json to manage projects and dependencies. To create this file we need to execute the npm init command and answer questions.
|
1 2 3 4 5 6 7 8 9 10 11 12 13 14 15 16 17 18 19 20 21 22 23 24 25 26 27 28 29 30 31 32 33 34 35 36 37 38 39 40 41 42 43 44 45 46 47 48 49 50 |
$ npm init This utility will walk you through creating a package.json file. It only covers the most common items, and tries to guess sensible defaults. See `npm help json` for definitive documentation on these fields and exactly what they do. Use `npm install <pkg>` afterwards to install a package and save it as a dependency in the package.json file. Press ^C at any time to quit. package name: (webpack-starter) version: (1.0.0) 0.0.1 description: Webpack starter kit entry point: (index.js) test command: git repository: http:// keywords: ebavs webpack javascript js es6 ecmascript6 babel eslint author: Victor license: (ISC) About to write to /webpack-starter/package.json: { "name": "webpack-starter", "version": "0.0.1", "description": "Webpack starter kit", "main": "index.js", "scripts": { "test": "echo \"Error: no test specified\" && exit 1" }, "repository": { "type": "git", "url": "http://" }, "keywords": [ "ebavs", "webpack", "javascript", "js", "es6", "ecmascript6", "babel", "eslint" ], "author": "Victor", "license": "ISC" } Is this ok? (yes) |
Install Webpack
Now is time to install webpack. We search to install webpack itself and a tool called webpack-dev-server that we will use later.
|
1 |
npm install webpack webpack-dev-server --save-dev |
The –save-dev option means that webpack is installed locally like development dependency in the project. If you want to install globally you can use -g option instead. I prefer local because is changing very fast and I don’t to leave working if I update globally to the last version.
First Steps and Configs
We create 2 folders. One for our code and another one for transpiled code (transpile is the way of transform one code into another code, for example, we will transform es6 in javascript)
|
1 2 |
$ mkdir src $ mkdir dist |
And create an index.js file inside src/ folder with the next easy content.
|
1 |
console.log("I'm alive!"); |
Create webpack.config.js and add the basic part of the configuration:
|
1 2 3 4 5 6 7 8 9 10 11 12 13 14 |
const conf = { src: __dirname + '/src', dist: __dirname + '/dist' }; module.exports = { entry: [ conf.src + '/index.js' ], output: { filename: 'bundle.js', path: conf.dist } }; |
This is the minimal configuration: we add a conf object with a path telling the two important paths. A second area, with module.export tells webpack what file needs to look like and what file need to generate.
Then we need to create a command to execute webpack through the command line. Open package.json and add “serve” task to scripts area. Scripts area looks like this:
|
1 2 3 4 |
"scripts": { "serve": "webpack --config webpack.config.js", "test": "echo \"Error: no test specified\" && exit 1" }, |
“serve” task executes webpack calling webpack.config.js and transpile js to another file.
And now try to run with the next command in bash:
|
1 2 3 4 5 6 7 8 9 10 11 |
$ npm run serve > webpack-starter@0.0.1 serve /Users/victor/Projects/webpack-starter > webpack --config webpack.config.js Hash: 6df9f811112873c143dc Version: webpack 3.8.1 Time: 60ms Asset Size Chunks Chunk Names bundle.js 2.66 kB 0 [emitted] main [0] multi ./src/index.js 28 bytes {0} [built] [1] ./src/index.js 72 bytes {0} [built] |
We created our bundle.js file. But we haven’t HTML yet and for the test, we need to use node:
|
1 2 |
$ node dist/bundle.js I'm alive! |
No, this is not a web!
But’s not the point. Why? Because we are developing a web and this not a web. We don’t want a node web application. We want a web. Ok, let’s add HTML basic. Now make an index.html inside src/ folder and add basic HTML code, we don’t need more:
|
1 2 3 4 5 6 7 8 9 10 |
<!DOCTYPE html> <html lang="en"> <head> <meta charset="UTF-8"> <title>Ebavs/</title> </head> <body> </body> </html> |
Install a required plugin for this operation.
|
1 |
$ npm install html-webpack-plugin --save-dev |
Open webpack.config.js and then open a new section called plugin adding new HTML webpack plugin:
|
1 2 3 4 5 6 7 8 9 10 11 12 |
module.exports = { entry: [ conf.src + '/index.js' ], output: { filename: 'bundle.js', path: conf.dist }, plugins: [ new HtmlWebpackPlugin() ] }; |
You can see HtmlWebpackPlugin Documentation here: Jantimon Github Webpack plugin html
Now we can execute again:
|
1 2 3 4 5 6 7 8 9 10 11 12 13 14 15 16 17 18 |
$ npm run serve > webpack-starter@0.0.1 serve /Users/victor/Projects/webpack-starter > webpack --config webpack.config.js Hash: f8a2fccda0a056ba3b84 Version: webpack 3.8.1 Time: 390ms Asset Size Chunks Chunk Names bundle.js 2.66 kB 0 [emitted] main index.html 182 bytes [emitted] [0] multi ./src/index.js 28 bytes {0} [built] [1] ./src/index.js 72 bytes {0} [built] Child html-webpack-plugin for "index.html": 1 asset [2] (webpack)/buildin/global.js 488 bytes {0} [built] [3] (webpack)/buildin/module.js 495 bytes {0} [built] + 2 hidden modules |
If we look inside dist/ folder we could see two files; index.html and bundle.js. HtmlWebpackPlugin gets js from config, and inject script tag inside HTML, if you open index.html with the browser and open inspector you should see “I’m alive!” message.
Actually, this is a little project, but don’t want to stop here. This is only the beginning. Let’s continue.
Begin to build a real web page with webpack
At this point, you have webpack with a little configuration but isn’t real. In a real project, you maybe use Bootstrap or Foundation with jQuery or maybe Angular. Anyway, also we need to know what we want to do, and I believe that a better thing is a TODO list!
For a real and simple to-do list, we need some images, fonts, CSS, maybe effects and good code. Good code, actually, means ES6 or ES7. We choose ES6. Then, we have all chosen, let’s do begin.
ES6 or ECMAScript 2015
Modern browsers do not understand ES6, we need to transpile to old-fashioned javascript. To make these transpilations we use babel. Babel is a library that understands a lot of languages and can transpile to javascript.
Install Babel (you can go to https://babeljs.io/ to see all capabilities, I only choose few for this project):
|
1 |
$ npm install babel-loader babel-core babel-preset-env --save-dev |
Now we tell webpack that use babel for transpile, to do that we need to add the area of a module with rules config:
|
1 2 3 4 5 6 7 8 9 10 11 12 13 14 15 16 17 18 19 |
entry: [ conf.src + '/index.js' ], output: { filename: 'bundle.js', path: conf.dist }, module: { rules: [ { test: /\.js$/, include: conf.src, loader: 'babel-loader' } ] }, plugins: [ new HtmlWebpackPlugin() ] |
Explanation: We are telling you that all js files (test property) in src/ folder needs to be loaded with babel-loader.
Now, to be sure that we are writing good and correct code we install a lint loader. Every time we write bad code lint tell us to correct:
|
1 |
$ npm install eslint-loader eslint babel-eslint eslint-config-airbnb eslint-plugin-import --save-dev |
And their rule inside modules:
|
1 2 3 4 5 6 7 8 9 10 11 12 13 14 15 16 |
module: { rules: [ { enforce: 'pre', test: /\.js$/, include: conf.src, exclude: /node_modules/, loader: 'eslint-loader' }, { test: /\.js$/, include: conf.src, loader: 'babel-loader' } ] }, |
We use enforce to be sure that we are executing eslint before babel. Thes use excludes because not want lint al external module.
Now in our root folder need to create a file called .eslintrc.json with this content:
|
1 2 3 |
{ "extends": "airbnb-base" } |
We are telling that eslint uses Airbnb rules. You can install other rules, Google has their:
|
1 |
$ node install eslint-config-google --save-dev |
And change “extends” to “google”, but not our case, Airbnb has good ones, you can inspect their rules: https://github.com/airbnb/javascript
Optional: if you want you can add a task in package.json spripts area to lint only. I think that is not needed but is good to be there:
|
1 2 3 4 5 |
"scripts": { "serve": "webpack --config webpack.config.js", "lint": "eslint src/ webpack.config.js", "test": "echo \"Error: no test specified\" && exit 1" }, |
Install dependent libraries
It’s time to install bootstrap and jQuery. These libraries have their package in npm repository. Install it:
|
1 |
$ npm install bootstrap jquery --save |
See that we used –save and not –save-dev. This is because these two libraries are used in our project and need to be there in production.
Test jQuery
Now test jQuery. Open index.js from src/ folder and change a little bit, remove console.log and add next lines:
|
1 2 3 |
import $ from 'jquery'; $('body').html('<p>I\'m alive!</p>'); |
If we transpile and open the browser we can see “I’m alive” on a browser page. Cooooool! we are moving forward, we have a phrase in the browser instead of the inspector.
But for use with Bootstrap we need more config, open webpack.config.js and add a new first line:
|
1 |
const webpack = require('webpack'); |
Then we tell config that uses a new plugin to convert jQuery into a global variable, plugins will be:
|
1 2 3 4 5 6 |
plugins: [ new HtmlWebpackPlugin(), new webpack.ProvidePlugin({ jQuery: 'jquery' }) ] |
if you halt this step, after add bootstrap, you will have an error saying that jQuery is not found.
Configure and test CSS/Bootstrap
Bootstrap is a collection of CSS and JS libraries. Include Bootstrap in our code needs an extra effort, first we install all needed and then I explain what is every module:
|
1 |
$ npm install style-loader css-loader sass-loader node-sass file-loader --save-dev |
Yeah!
- style-loader: gets our CSS files and inject them inside <style> tags.
- CSS-loader: interprets @import and url() from CSS and resolve them
- sass-loader (node-sass): gets sass and transpiles to CSS
- file-loader: gets a file and return new name with md5 hash. It’s needed by previous loaders.
Open webpack.config.js and add:
|
1 2 3 4 5 6 7 8 9 10 11 12 13 14 15 16 17 18 19 20 21 22 23 24 25 26 |
{ test: /\.(scss|css)$/, use: [ { loader: 'style-loader', options: { sourceMap: true } }, { loader: "css-loader", options: { sourceMap: true } }, { loader: "sass-loader", options: { outputStyle: 'expanded', sourceMap: true, sourceMapContents: true } } ], include: [conf.src] }, |
Paste this code after babel-loader rule.
ES6 doesn’t know how to handle and import current CSS. If you try to import bootstrap CSS directly to index.js you will have an error. To avoid this we make a style.scss and put it in src/ folder with next content:
|
1 |
@import '~bootstrap/dist/css/bootstrap.css'; |
The tilde (~) means that need to look inside the node_modules folder.
And finally, we add code to index.js that looks like this:
|
1 2 3 4 5 6 |
import $ from 'jquery'; import 'bootstrap'; import './style.scss'; $('body').html('<div class="container"><p>I\'m alive!</p></div>'); |
I’ve added a new div to see if bootstrap is working. Run npm task …….. And yeees!

Webpack-dev-server
Now, we have to work our base to begin the development, but I don’t want to run webpack every time I made a change in code. To avoid running tasks every time, we have two options; You can run webpack with –watch, which is good or you can run webpack-dev-server, which is better.
The difference is that –watch option leave webpack executed and run every time that rode is changed. It’s ok, but we need more power because we are developing web, and debug javascript, then is better a web server. With webpack-dev-server, you will have a real web-server integrated with webpack. We installed with webpack, the only want we need changes configuration. Open package.json and change server option:
|
1 |
"serve": "webpack-dev-server --config webpack.config.js" |
Then if you run:
|
1 |
$ npm run serve |
You will see all compilations, listings and then ready to browse: http://localhost:8080/
Changing webpack-dev-server configuration
Alternatively, you can change some parameters of the web server adding some parameters in webpack.config.js:
|
1 2 3 4 5 6 7 8 9 10 11 |
module.exports = { devServer: { port: 3000 }, entry: [ conf.src + '/index.js' ], output: { filename: 'bundle.js', path: conf.dist }, |
Adding devServer to config we can change the port, I prefer 3000 instead 8080.
You can see all options here: https://webpack.js.org/configuration/dev-server/
Developing Project
We have now the project with a good base. Let’s begin to create our real to-do application.
Making Views
ES6 have one important feature, have templating. You can store HTML in a variable and then inject it later on our web page.
Make new views.js in src/ folder. We put inside the little templates for creating the page:
|
1 2 3 4 5 6 7 8 9 10 11 12 13 14 15 16 17 |
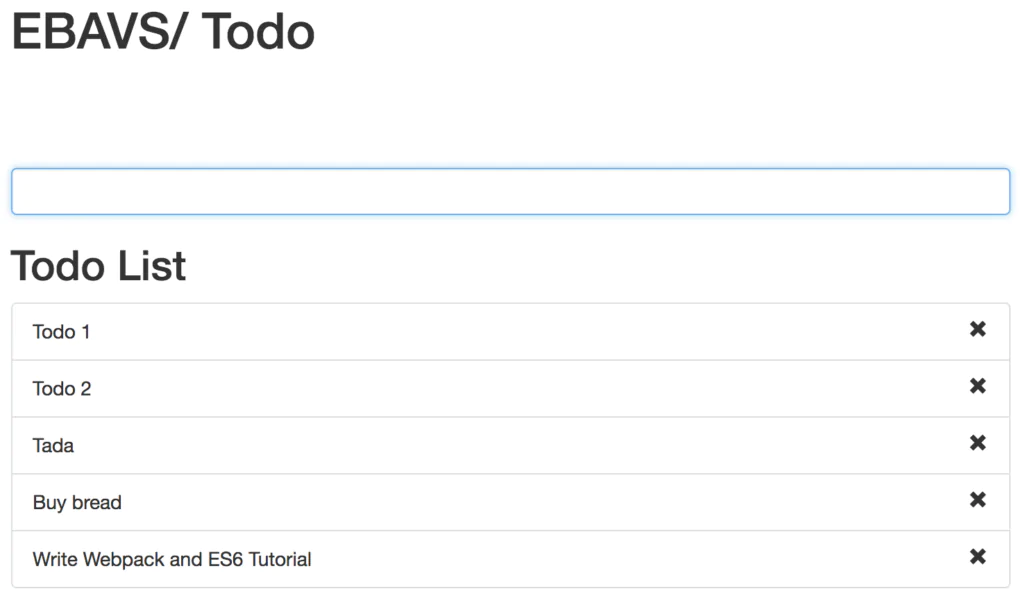
const container = ` <div class="container"> <h1>EBAVS/ Todo</h1> <main></main> </div> `; const todoBox = ` <div class="row"> <div class="col-md-8 col-md-offset-2"> <input type="text" class="form-control todo-item" /> </div> </div> `; const viewCollection = { container, todoBox }; export default viewCollection; |
We have here to constants with a little bit of HTML. The first constant is the container. The second one is the input text box where we will write tasks.
After definition, we add to an object collection and use export to say ES6 that we can use in other files.
Then we can open style.scss file and add some CSS to separate box to the top of the page:
|
1 2 3 |
main { margin-top: 80px; } |
Making Controller
Now we make the controller, create a file called controller.js. Thi file will be responsible to load views and manage events and data.
It’s time to make with a few lines, only for initialize and show data to the browser:
|
1 2 3 4 5 6 7 8 9 10 11 12 13 14 15 16 17 18 19 20 21 22 23 24 25 26 27 28 29 30 31 32 33 34 35 36 37 |
export default class Controller { /** * @param {!$} jq jQuery * @param {!viewCollection} vc viewCollection array */ constructor(jq, vc) { this.jquery = jq; this.views = vc; } initViews() { // construct base view const container = this.jquery(this.views.container); this.jquery('body').html(container); this.jquery(this.views.todoBox).appendTo('main'); } /** * @param {!event} e jQuery event */ static addItem(e) { } bindEvents() { // we can do better but is a simple tutorial to understand webpack and ES6 this.jquery('.todo-item').on('keypress', e => (Controller.addItem(e))); } start() { // initialize all this.initViews(); this.bindEvents(); } } |
Then we have a constructor that receives jQuery and views and store them in properties. Then you have initViews method that initializes HTML and injects it to DOM via jQuery. Then you have bindEvents to bind events to DOM and start a method that calls previous methods.
Put it all working
We have two files (views and controllers) but aren’t called yet. Then open index.js and will see this code:
|
1 2 3 4 5 6 7 8 9 10 |
import $ from 'jquery'; import 'bootstrap'; import './style.scss'; import viewCollection from './views'; import Controller from './controller'; const c = new Controller($, viewCollection); c.start(); |
Import jQuery and bootstrap and styles and then import views and Controller and call it. Simple. If you browse now you will see the first approach to our ToDo List.

Isn’t working yet. But we will go to our final steps!
Making all working
We have the base. It’s time to finish this little project coding final events. We don’t want to extend more, don’t store todos in any place. Simply add and remove. Let’s do it!
Adding to Views
Into views, we have only brand and input text. We need to list items and to-do items. Add next lines to view.js to add new views:
|
1 2 3 4 5 6 7 8 9 10 11 12 13 14 15 16 17 |
const todoList = ` <div class="row"> <div class="col-md-8 col-md-offset-2"> <h2>Todo List</h2> <ul class="list-group item-list"> </ul> </div> </div> `; const todoItem = (item => ` <li class="list-group-item"> <span class="glyphicon glyphicon-remove pull-right remove-item" data-id="${item.id}"></span> ${item.text} </li> `); |
And now change view collection constant to add new elements:
|
1 2 3 4 5 6 |
const viewCollection = { container, todoBox, todoList, todoItem, }; |
Cool, we have now all view parts ready.
Finishing Controller
The controller has the simple binding, addItem method is empty and is static. We need to code all of this. But, first of all, we need to finish initViews because we want to inject the item list on the page:
|
1 2 3 4 5 6 7 8 9 10 |
initViews() { // add container to page const container = this.jquery(this.views.container); this.jquery('body').html(container); // insert box this.jquery(this.views.todoBox).appendTo('main'); // insert List this.jquery(this.views.todoList).appendTo('main'); } |
We have now a list rendered on the page. Time to code addItem method, but for code, we need to change the constructor to create an item list to store our todos:
|
1 2 3 4 5 |
constructor(jq, vc) { this.jquery = jq; this.views = vc; this.itemList = []; } |
And:
|
1 2 3 4 5 6 7 8 9 10 11 12 13 14 15 16 17 18 19 20 21 22 |
/** * @param {!event} e jQuery event */ addItem(e) { // only act if we press enter and input isn't empty if (e.keyCode === 13 && e.target.value) { // store this instance const me = this; // we get array lenght to use as new id const index = this.itemList.length; // creating todo const item = { id: index, text: e.target.value, }; // add todo to item list this.itemList.push(item); e.target.value = ''; // add element to dom and bind to event this.jquery('.item-list').append(this.jquery(this.views.todoItem(item)).on('click', event => (me.removeItem(event)))); } } |
Note that we are calling removeItem, create it:
|
1 2 3 4 5 6 7 8 9 10 |
removeItem(elem) { // get id from span element const id = this.jquery(elem.target).data('id'); // search for index in list const index = this.itemList.findIndex(i => parseInt(i.id, 0) === parseInt(id, 0)); // remove todo in list this.itemList.splice(index, 1); // remove element in dom this.jquery(elem.target).parent('li').remove(); } |
And bindEvents changed to; we need to change call to addItem because isn’t static;
|
1 2 3 4 5 |
bindEvents() { // we can do better but is a simple tutorial to understand webpack and es6 const me = this; this.jquery('.todo-item').on('keypress', e => (me.addItem(e))); } |
You can run the project and see that all are working as expected. If not, please, feel free to comment on any errors you have and I will help you to make this work.
Webpack config for debugging
If you browse the project and open the web inspector you will notice that is impossible to debug the project because the code is hidden inside webpack envelope. If you try to look at variable values or do some debug you will enter in a full head pain!
To avoid this situation and serve correct code to chrome we need to add an option to our webpack.config.js :
|
1 2 3 4 5 6 7 8 |
module.exports = { devtool: 'eval-cheap-module-source-map', devServer: { port: 3000 }, entry: [ conf.src + '/index.js' ], |
The devtool option allows saying webpack and webpack-dev-server that we need to use source map to our code. If you browse the project you will notice that can search files with CMD + P (Ctrl+P) and add breakpoints, etc …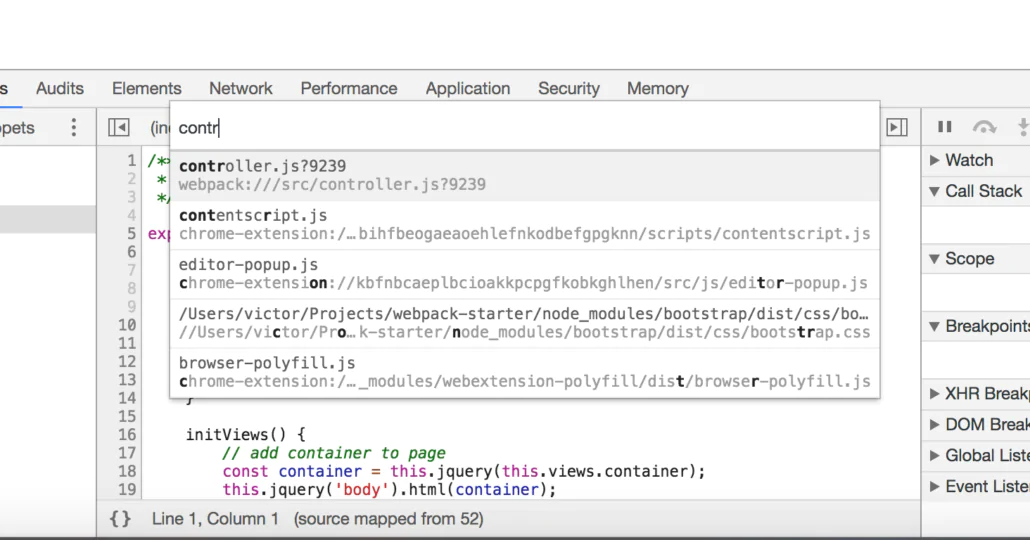
Final Words
In a real-world project is probable that you don’t use jquery and bootstrap in a project. Actually are other cool tools you can use in your project like underscore, lodash or some others instead of jquery.
For me, include jquery in this project was a real pain because isn’t prepared for modern life projects. jQuery was created to make it easy life to create simple projects and projects with ES6 and Webpack are other words.
The same for bootstrap. On EBAVS/ bootstrap are changed to other CSS templates like foundation or skeleton. Bootstrap it’s a big project and sometimes we only need the grid and some helper functions to develop a single project. Bootstrap is a little monster now with a lot of components that we don’t use.
You can clone a project from GitHub: Github EBAVS/ webpack ES6 tutorial
Node.js is actually an essential tool for every developer. Basically are a javascript interpreter for a command line. This is very interesting because allows executing javascript in any environment; you can make server-side applications, command-line tools, webs, etc. An actually have a lot of followers, apps, frameworks to work with it. This ecosystem is incredible and make it easier life when you work with it.
But Node isn’t alone. Come with another powerful tool called npm. Npm is a package manager that allows installing of third party libraries in javascript. For development, this is amazing because you could have an entire development environment in minutes.
Let’s do install Node.
Install Node
you have two ways to install in Mac OS X.
Use Installer
The easiest way to install a node is with the package manager.
- Go to https://nodejs.org/en/download/
- Download Mac installer version
- Execute and follow step by step
Use Homebrew
Homebrew is defined as a package manager that OS X should have. First, we need to install homebrew. Open a terminal window and write:
|
1 |
$ /usr/bin/ruby -e "$(curl -fsSL https://raw.githubusercontent.com/Homebrew/install/master/install)" |
After some text, you can test it works:
|
1 2 3 |
$ brew -v Homebrew 1.2.3 Homebrew/homebrew-core (git revision 501b; last commit 2017-06-27) |
Now we can install Node:
|
1 |
$ brew install node |
And after some more text, you will be Node.JS installed.
Test It
If you open a terminal and write:
|
1 |
$ node -v && npm -v |
You will have the version output:
|
1 2 |
v8.1.4 5.3.0 |
Why use Homebrew instead Installer
Why is better to use homebrew instead of the installer? Easy, you need administrative privileges to install, this means use Sudo to install with package installer and are a big problem for working with it. You will need to use Sudo in front of the node and this one doesn’t like execution with root privileges. To avoid this problem use Homebrew to install it.
Docker is a new way to use virtual machines (someone expert that read this, not hates me, it’s a way to show what it is). Docker represents an easy step to install services on our machine without installing it. This means, is like a virtual machine using your own hardware instead of virtualizing it and where you can install things. It’s complex to explain because Docker is a half-path between your own computer and Virtual Machine.
The best way to understand what is and why use it is creates a basic example. We are web developers, the best is to create an Apache Image with PHP and execute some code.
Install Docker
Let’s try it. First, install Docker, this is important. If you don’t install the examples in this article couldn’t work!
You can download a copy of Docker here: Docker Engine installation
Install and …. continue.
Now it’s time to create containers. Docker has containers, a container is a service installed and you can pile containers to add more services. Let’s go to work and stop rare words!!
Create Image
This tutorial talks about creating an image that you can use and reuse. Time to create. Move to a new folder and create a file called Dockerfile and add the next lines:
|
1 2 |
FROM chialab/php:5.6-apache ENV APACHE_LOG_DIR /var/www/html |
It’s a two-line file. Simple instructions:
- FROM chialab/php:5.6-apache: tell what docker image you want to use. I’m choosing chialab images because have a lot of libraries installed. You can choose another one if you want. Feel free, I always use it because have all I need for development. Search images here: Hub docker
- ENV APACHE_LOG_DIR /var/www/html : Tell image internal environment variable.
Time to build. We have a simple Dockerfile and now need to build our image, open the terminal window and move to the Dockerfile folder and execute the command:
|
1 2 3 4 5 6 7 8 9 |
$ docker build -t apache . Sending build context to Docker daemon 58.88 kB Step 1/2 : FROM chialab/php:5.6-apache ---> 8e6d99015b2a Step 2/2 : ENV APACHE_LOG_DIR /var/www/html ---> Running in 287a83bfeb9f ---> e698e101ee27 Removing intermediate container 287a83bfeb9f Successfully built e698e101ee27 |
We built an apache image, execute the next command to see your images:
|
1 2 3 |
$ docker images REPOSITORY TAG IMAGE ID CREATED SIZE apache latest e698e101ee27 3 minutes ago 499 MB |
Use Image
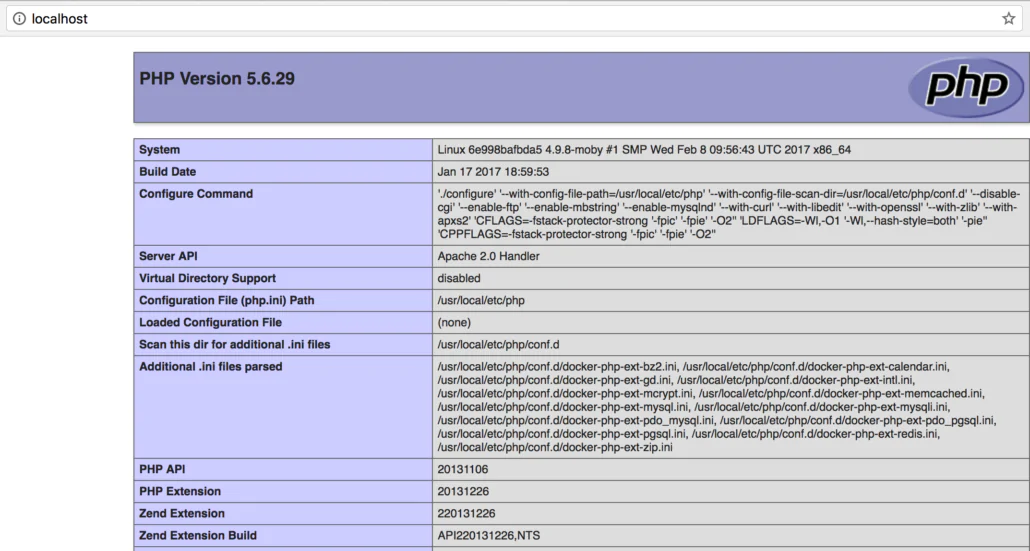
Now it’s time to use it. Then, create an index.php page with phpinfo() instructions.
|
1 2 3 |
<?php phpinfo(); |
Only one more step and we are done. Time to execute the magic command:
|
1 |
$ docker run -v $PWD:/var/www/html -p 80:80 apache |
What’s the meaning of commands?
- docker run: tells to execute image
- -v: is for mount volumes. I’m telling that folder $PWD (it’s system variable for actual folder) maps to /var/www/html inside image
- -p: map port 80 on our computer to port 80 in an image.
- apache: Docker image name
If you aren’t using Mac Os X or any Linux based OS you can change $PWD for another folder:
|
1 |
> docker run -v /c/Projects/php:/var/www/html -p 80:80 apache |
And finally, open your browser and write https://localhost You will see a phpinfo() information:
You are running a web server now with apache. Thanks to docker it’s easy to create environments without installing any software on our computers.
In 2016, we created in EBAVS / our Christmas postcard to wish Happy Holidays.
A familiar DIY with:
- Red card
- Love
- White paper
- 6 years Old Daughter
- Orange paper
- Cryings
- White pencil
- Scissors
- Smiles
- Dotted Paper
- Shouts
- Glue
- 10 Months baby boy
- Blue marker
- Patience
- Effort
Happy Holidays to all with a REAL XMAS POSTCARD!

The lasts years we did a Christmas action: The pooping log, or a cake
Git Workflow or GitFlow it’s a development model to work with code and git. We use extended in our code to make conflicts between developers less than possible. The reality is that Git Workflow is branch management for organizing code and developers. There are many ways you can manage branches, we only use 2 or 3 at least, but you can combine them (we do) into more possibilities.
If you don’t know about Git or Branch you can read our previous post:
Basic Workflow
Actually, a lot of developers works alone and git give them the security of know that their code is well organized in a lot of commits. If you are a little bit organized you will do push for every functionality, for example, add a delete button to code, and you know every commit is a function. Sometimes no, simply you are developing and every time you remember to do a commit. This other way too, because you are in fast mode and can’t stop to think some details. Anyway, imagine that you need help and someone comes to help with development tasks. You give them access to git and he/she clone code and begin the work. The most normal is both developers work in the same branch, master.
Let we see what happens. Two developers, Barbara and Victor. One repository with one branch. Victor begins to work:
|
1 2 3 4 5 |
$ mkdir ebavs-gitflow $ cd ebavs-gitflow $ git init Initialized empty Git repository in ./Projects/ebavs-gitflow/.git/ $ git remote add origin https://github.com/ebavs/workflow-example.git |
Then create a basic PHP with some HTML inside:
|
1 2 3 4 5 6 7 8 9 10 11 12 |
<?php $msg = 'Victor was here'; ?> <html> <head> <title>Git WorkFlow Example</title> </head> <body> <p>The train goes forward unstoppable</p> <p><?php echo $msg; ?> <body> </html> |
(yes, I forgot one p tag)
Now I add a file and commit push:
|
1 2 3 4 5 6 7 8 9 10 11 12 13 14 15 |
$ git add . $ git commit -m "Created index.php" [master (root-commit) 997017b] Created index.php 1 file changed, 12 insertions(+) create mode 100644 index.php $ git push origin master Username for 'https://github.com': Password for 'https://fromcouch@github.com': Counting objects: 3, done. Delta compression using up to 8 threads. Compressing objects: 100% (2/2), done. Writing objects: 100% (3/3), 347 bytes | 0 bytes/s, done. Total 3 (delta 0), reused 0 (delta 0) To https://github.com/ebavs/workflow-example.git * [new branch] master -> master |
Then Barbara comes to work and Victor give access to her (we use the same user in different folders, that is similar):
|
1 2 3 4 5 6 7 8 9 10 11 12 13 14 15 |
$ mkdir ../ebavs-workflow $ cd ../ebavs-workflow $ git clone https://github.com/ebavs/workflow-example.git . Cloning into 'workflow-example'... remote: Counting objects: 3, done. remote: Compressing objects: 100% (2/2), done. remote: Total 3 (delta 0), reused 3 (delta 0), pack-reused 0 Unpacking objects: 100% (3/3), done. Checking connectivity... done. $ ll total 8 drwxr-xr-x 4 victor staff 136 Dec 14 16:58 . drwxr-xr-x@ 61 victor staff 2074 Dec 14 16:57 .. drwxr-xr-x 13 victor staff 442 Dec 14 16:58 .git -rw-r--r-- 1 victor staff 181 Dec 14 16:58 index.php |
Yeah! we have now the same repo in two folders, it’s like Victor and Barbara works now. Then, Barbara begins to develop and add a new line to index.php:
|
1 2 3 4 5 6 7 8 9 10 11 12 13 |
<?php $msg = 'Victor was here'; ?> <html> <head> <title>Git WorkFlow Example</title> </head> <body> <p>The train goes forward unstoppable</p> <p><?php echo $msg; ?> <p>But finally brakes and stop</p> <body> </html> |
She commits and pushes:
|
1 2 3 4 5 6 7 8 9 10 11 12 |
$ git commit -am "added stop" [master f2e1adc] added stop 1 file changed, 1 insertion(+) $ git push origin master Counting objects: 3, done. Delta compression using up to 8 threads. Compressing objects: 100% (2/2), done. Writing objects: 100% (3/3), 308 bytes | 0 bytes/s, done. Total 3 (delta 1), reused 0 (delta 0) remote: Resolving deltas: 100% (1/1), completed with 1 local objects. To https://github.com/ebavs/workflow-example.git 997017b..f2e1adc master -> master |
And like a good coworker, she tells to Victor and he pulls changes:
|
1 2 3 4 5 6 7 8 9 10 11 12 13 |
$ cd ../ebavs-gitflow/ $ git pull origin master remote: Counting objects: 3, done. remote: Compressing objects: 100% (1/1), done. remote: Total 3 (delta 1), reused 3 (delta 1), pack-reused 0 Unpacking objects: 100% (3/3), done. From https://github.com/ebavs/workflow-example * branch master -> FETCH_HEAD 997017b..f2e1adc master -> origin/master Updating 997017b..f2e1adc Fast-forward index.php | 1 + 1 file changed, 1 insertion(+) |
Then Victor review the changes editing index.php. Victor sees p tag mistake and decide to change the line and something else:
|
1 2 3 4 5 6 7 8 9 10 11 12 13 |
<?php $msg = 'Really Victor was here'; ?> <html> <head> <title>Git WorkFlow Example</title> </head> <body> <p>The train goes forward unstoppable</p> <!-- <?php echo $msg; ?> --> <p>But finally brakes and stop</p> <body> </html> |
He commits and pushes:
|
1 2 3 4 5 6 7 8 9 10 11 12 |
$ git commit -am "solved p tag bug" [master 12ec268] solved p tag bug 1 file changed, 2 insertions(+), 2 deletions(-) $ git push origin master Counting objects: 3, done. Delta compression using up to 8 threads. Compressing objects: 100% (2/2), done. Writing objects: 100% (3/3), 311 bytes | 0 bytes/s, done. Total 3 (delta 1), reused 0 (delta 0) remote: Resolving deltas: 100% (1/1), completed with 1 local objects. To https://github.com/ebavs/workflow-example.git f2e1adc..12ec268 master -> master |
And Barbara, see the same mistake and make similar changes:
|
1 2 3 4 5 6 7 8 9 10 11 12 13 |
<?php $msg = 'Barbara was here'; ?> <html> <head> <title>Git WorkFlow Example</title> </head> <body> <p>The train goes forward unstoppable</p> <p><?php echo $msg; ?></p> <p>But finally brakes and stop</p> <body> </html> |
And …
|
1 2 3 4 5 6 7 8 9 10 11 12 |
git commit -am "solved p tag bug" [master 61fbf1a] solved p tag bug 1 file changed, 2 insertions(+), 2 deletions(-) $ git push origin master To https://github.com/ebavs/workflow-example.git ! [rejected] master -> master (fetch first) error: failed to push some refs to 'https://github.com/ebavs/workflow-example.git' hint: Updates were rejected because the remote contains work that you do hint: not have locally. This is usually caused by another repository pushing hint: to the same ref. You may want to first integrate the remote changes hint: (e.g., 'git pull ...') before pushing again. hint: See the 'Note about fast-forwards' in 'git push --help' for details. |
.. Fail. What the hell!? both of them changes the same lines and Barbara, second to push have a real problem. But isn’t the big problem, she tries to pull:
|
1 2 3 4 5 6 7 8 9 10 11 |
$ git pull origin master remote: Counting objects: 3, done. remote: Compressing objects: 100% (1/1), done. remote: Total 3 (delta 1), reused 3 (delta 1), pack-reused 0 Unpacking objects: 100% (3/3), done. From https://github.com/ebavs/workflow-example * branch master -> FETCH_HEAD f2e1adc..12ec268 master -> origin/master Auto-merging index.php CONFLICT (content): Merge conflict in index.php Automatic merge failed; fix conflicts and then commit the result. |
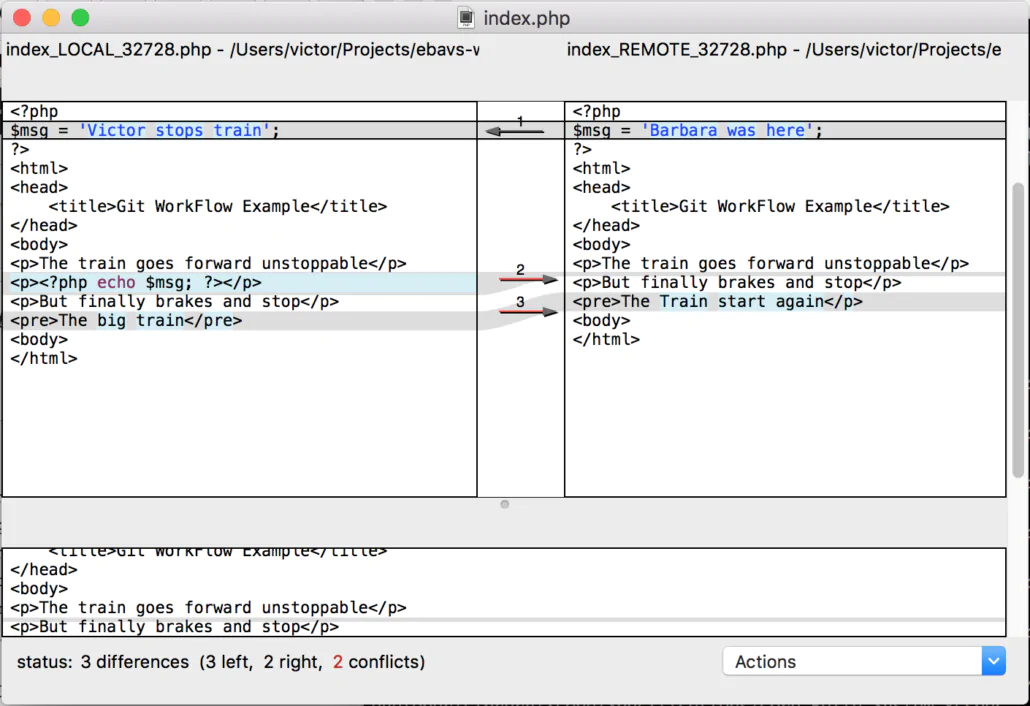
Git found a big conflict because changed lines are the same in two repositories. And Barbara decides to open index.php to see what happened:
|
1 2 3 4 5 6 7 8 9 10 11 12 13 14 15 16 17 18 19 20 21 |
<?php <<<<<<< HEAD $msg = 'Barbara was here'; ======= $msg = 'Really Victor was here'; >>>>>>> 12ec268ec8266e0cc5ea1fdbde4ebce6724cb5ba ?> <html> <head> <title>Git WorkFlow Example</title> </head> <body> <p>The train goes forward unstoppable</p> <<<<<<< HEAD <p><?php echo $msg; ?></p> ======= <!-- <?php echo $msg; ?> --> >>>>>>> 12ec268ec8266e0cc5ea1fdbde4ebce6724cb5ba <p>But finally brakes and stop</p> <body> </html> |
Oh!! it’s terrible, a lot of awful code is new in the file. Ok, let’s see what we can do. Git divides conflicts into two areas, this is the area corresponding to code in our own machine repository:
|
1 2 3 |
<<<<<<< HEAD $msg = 'Barbara was here'; ======= |
And the other part is corresponding to the server repository:
|
1 2 3 |
======= $msg = 'Really Victor was here'; >>>>>>> 12ec268ec8266e0cc5ea1fdbde4ebce6724cb5ba |
Now Barbara needs to clean code deciding what part is correct and what isn’t (you can use some automatic tools, but that isn’t the purpose of this article). Finally, Barbara cleans the code:
|
1 2 3 4 5 6 7 8 9 10 11 12 13 |
<?php $msg = 'Barbara was here'; ?> <html> <head> <title>Git WorkFlow Example</title> </head> <body> <p>The train goes forward unstoppable</p> <!-- <?php echo $msg; ?> --> <p>But finally brakes and stop</p> <body> </html> |
And now we need to commit and push again:
|
1 2 3 4 5 6 7 8 9 10 11 |
$ git commit -am "merging" [master c65701a] merging $ git push origin master Counting objects: 6, done. Delta compression using up to 8 threads. Compressing objects: 100% (4/4), done. Writing objects: 100% (6/6), 549 bytes | 0 bytes/s, done. Total 6 (delta 2), reused 0 (delta 0) remote: Resolving deltas: 100% (2/2), completed with 1 local objects. To https://github.com/ebavs/workflow-example.git 12ec268..c65701a master -> master |
The difficulty isn’t to modify 2 lines and decide what line is correct. Imagine one file with thousands of code lines and three or four developers. Or Worst, ten files with thousands of modifying code. The poor guy that gets merge problems has all loose day looking for the code problems.
Git Workflows Type
Now we saw the big problem working with the same repository and one branch. We discuss now different ways to avoid problems with different types of workflows.
Feature Branch Workflow
After the hell of Basic Workflow or Centralized Workflow, it’s easy to think to leave this kind of work. It’s a hell, a real hell. I participate in a 4 members team, a lot of years ago, working with Centralized Workflow and was really hell. Entire weeks loses merging code, it was a nightmare.
All of my problems could have been solved used this simple way of work. Making single Branch for every feature. The idea is simple, you make a new branch for every feature you need to implement.
Let’s explain and continue the Barbara and Victor history :)
After Victor review the code decides to move to Feature Branch Workflow then he decides to create two branches, one for add code and another for add HTML:
|
1 2 3 4 5 6 7 8 9 10 11 12 13 14 15 16 17 18 19 20 21 |
$ git branch * master $ git checkout -b feature-code Switched to a new branch 'feature-code' $ git checkout master Switched to branch 'master' Your branch is up-to-date with 'origin/master'. $ git checkout -b feature-html Switched to a new branch 'feature-html' $ git push origin feature-code Total 0 (delta 0), reused 0 (delta 0) To https://github.com/ebavs/workflow-example.git * [new branch] feature-code -> feature-code $ git push origin feature-html Total 0 (delta 0), reused 0 (delta 0) To https://github.com/ebavs/workflow-example.git * [new branch] feature-html -> feature-html $ git branch feature-code * feature-html master |
With git checkout -b new branch can create a new branch and change to them, the important is -b option that means “create a new branch. Now we are in feature-HTML and we need to add some HTML file to our index.php, Barbara begins their work:
|
1 2 3 4 5 6 7 8 9 10 11 12 13 |
<?php $msg = 'Barbara was here'; ?> <html> <head> <title>Git WorkFlow Example</title> </head> <body> <p>The train goes forward unstoppable</p> <p>But finally brakes and stop</p> <pre>The Train start again</p> <body> </html> |
We remove the commented PHP line and add a new one at the end. Now it’s time to commit and push.
|
1 2 3 4 5 6 7 8 9 10 11 12 |
$ git commit -am "added html part" [feature-html 1326f71] added html part 1 file changed, 1 insertion(+), 1 deletion(-) $ git push origin feature-html Counting objects: 3, done. Delta compression using up to 8 threads. Compressing objects: 100% (2/2), done. Writing objects: 100% (3/3), 309 bytes | 0 bytes/s, done. Total 3 (delta 1), reused 0 (delta 0) remote: Resolving deltas: 100% (1/1), completed with 1 local objects. To https://github.com/ebavs/workflow-example.git c65701a..1326f71 feature-html -> feature-html |
Now time for Victor, he needs to add some code, first we change the branch and begin codification:
|
1 2 3 4 5 6 7 8 9 10 11 12 13 14 |
$ git checkout feature-code Switched to branch 'feature-code' $ nano index.php $ git commit -am "added code" [feature-code 3c8aa1e] added code 1 file changed, 3 insertions(+), 2 deletions(-) $ git push origin feature-code Counting objects: 3, done. Delta compression using up to 8 threads. Compressing objects: 100% (2/2), done. Writing objects: 100% (3/3), 400 bytes | 0 bytes/s, done. Total 3 (delta 0), reused 0 (delta 0) To https://github.com/ebavs/workflow-example.git c65701a..3c8aa1e feature-code -> feature-code |
We have actually 3 branches with different codes and need this code altogether. Like Victor is a master developer, he controls now the merge ad code, first integrates the feature-code branch:
|
1 2 3 4 5 6 7 8 9 10 11 12 13 14 15 16 17 18 19 20 21 22 23 |
$ git checkout master Switched to branch 'master' Your branch is up-to-date with 'origin/master'. $ git pull origin master From https://github.com/ebavs/workflow-example * branch master -> FETCH_HEAD Already up-to-date. $ git pull origin feature-code From https://github.com/ebavs/workflow-example * branch feature-code -> FETCH_HEAD Updating c65701a..3c8aa1e Fast-forward index.php | 5 +++-- 1 file changed, 3 insertions(+), 2 deletions(-) $ git status On branch master Your branch is ahead of 'origin/master' by 1 commit. (use "git push" to publish your local commits) nothing to commit, working directory clean $ git push origin master Total 0 (delta 0), reused 0 (delta 0) To https://github.com/ebavs/workflow-example.git c65701a..3c8aa1e master -> master |
See the process, first change branch to master: git checkout master
Then pull code from the server, we need to have the latest code: git pull origin master
Then pull feature-code branch: git pull origin feature-code
Now we have merged code, we could do the same with git merge feature-code
After code merged we need to push: git push origin master
Now we can do the same process with the other branch:
|
1 2 3 4 5 6 |
$ git pull origin feature-html From https://github.com/ebavs/workflow-example * branch feature-html -> FETCH_HEAD Auto-merging index.php CONFLICT (content): Merge conflict in index.php Automatic merge failed; fix conflicts and then commit the result. |
It’s the same error as before, but here resides the difference: Victor, in this case, are Team Lead, knows what happens with code and how to resolve conflicts, indifferent to Barbara that just arrives at the project. Too we introduce new command: git mergetool
Maybe you haven’t configured the repository with any tool, but your system won’t let you alone:
|
1 2 3 4 5 6 7 8 9 10 11 12 13 |
$ git mergetool This message is displayed because 'merge.tool' is not configured. See 'git mergetool --tool-help' or 'git help config' for more details. 'git mergetool' will now attempt to use one of the following tools: opendiff tortoisemerge emerge vimdiff Merging: index.php Normal merge conflict for 'index.php': {local}: modified file {remote}: modified file Hit return to start merge resolution tool (opendiff): |
I’m assuming that open diff is there and just hitting enter:
This looks better than edit the directly file in the editor. The tool will be different depending on your Operating System, my case is Mac OS X then this is the default tool. Just arrange some lines and finish.
And:
|
1 2 3 4 5 6 7 8 9 10 11 |
$ git commit -am "merged" [master e72e0cc] merged $ git push origin master Counting objects: 3, done. Delta compression using up to 8 threads. Compressing objects: 100% (2/2), done. Writing objects: 100% (3/3), 318 bytes | 0 bytes/s, done. Total 3 (delta 1), reused 0 (delta 0) remote: Resolving deltas: 100% (1/1), completed with 1 local objects. To https://github.com/ebavs/workflow-example.git 3c8aa1e..e72e0cc master -> master |
Yes, we have completed our Feature Branch Workflow. If you use Bitbucket web page or Github web page for make merges is more easy and intuitive. I will talk about merge with bitbucket or GitHub in another post.
User Branch Workflow
User Branch development isn’t recommended for any. Just is to create a branch for every person in your team and all of them do merges to master. It’s also highly recommended to merge from the master te person branch. I worked before with this system in a big company with a little crazy Lead Developer. It’s not a bad idea if you are small teams (two persons), but with big teams it’s insane.
No examples here, just wanted to comment on the option.
GitFlow
GitFlow borns with nvie post.
He explains a way to organize branches to work. It’s easy, it’s organized, it’s cool, it’s fantastic, terrific! Nvie divides work into two main branches and supporting branches. Let’s see how it works.
Main Branches
After you init your repository and add some code you need to add one branch called to develop. You will have two main branches:
- master: master branch will be the production branch. The code here is the same as will be on the production server. Every time you merge code from developing to here means you need to upload code (or push-pull) to production.
- develop: this is the main branch where code comes to test before production. No one uses this branch, the code only come from merges.
It’s easy to understand. The Master branch is production, develop is where we test code. When you think the code is correct in development it’s time to merge to master and upload to production.
Supporting Branches
Are three types of auxiliary branches:
- Feature Branches: Every time you need to make a new feature you can create a feature branch. You can name wherever you want, but in EBAVS/ we name with feature-* convention:
|
1 2 3 4 5 6 7 8 9 10 11 12 13 |
$ git checkout -b feature-newfeature develop Switched to a new branch "myfeature" $ git checkout develop Switched to branch 'develop' $ git merge --no-ff feature-newfeature Updating fa5b31f..4be9466 $ git branch -d feature-newfeature Deleted branch feature-newfeature (was 4be9466). $ git push origin develop |
Is important to use –no-ff option. This means no fast forward. Fast Forward loses history when you do merge. Is important to maintain history.
- Releases Branches: Releases Branches is where features go, you can prepare here a production release. They born in develop branch and You can name with a minor or revision number. After you finish release, you can merge with the master branch directly, create a tag with revision, merge release into develop and finally remove the release branch:
|
1 2 3 4 5 6 7 8 9 10 11 12 13 14 15 16 17 18 19 20 21 |
$ git checkout -b release-0.2 develop Switched to a new branch "release-0.2" $ git checkout master Switched to branch 'master' $ git merge --no-ff release-0.2 Merge made by recursive. (Summary of changes) $ git tag -a 0.2 $ git checkout develop Switched to branch 'develop' $ git merge --no-ff release-0.2 Merge made by recursive. (Summary of changes) $ git branch -d release-0.2 Deleted branch release-0.2 (was eb425ee). |
- Hotfix Branches: Hotfix branches are branches that born from the master branch because code needs to fix urgently. After fixing the code you can merge again to master and develop. Naming is with revision number:
|
1 2 3 4 5 6 7 8 9 10 11 12 13 14 15 16 17 18 |
$ git checkout -b hotfix-0.2.1 master Switched to a new branch "hotfix-0.2.1" $ git merge --no-ff hotfix-0.2.1 Merge made by recursive. (Summary of changes) $ git tag -a 0.2.1 $ git checkout develop Switched to branch 'develop' $ git merge --no-ff hotfix-0.2.1 Merge made by recursive. (Summary of changes) $ git branch -d hotfix-0.2.1 Deleted branch hotfix-0.2.1 (was ab531fb). |
Finally
This tool is powerful, you can use it to organize your code or to ensure that you can develop in a quick and safe way. But if you use it in a bad way could convert into pain. GitFlow it’s a good workflow we can use actually. Maybe are others, but this one fits perfectly in our day to day coding.
This article is dedicated to Alex, that asks me how to create a basic CRUD from a database without development, this is called Scaffolding.
For me, Scaffolding is one of the most amazing techniques that people don’t want to use. Exist a major reason, that reason is every time someone accesses the URL and execute the code, a huge process begins asking for the database and constructing the CRUD from zero.
Exist a lot of frameworks with Scaffolding in PHP, but I prefer CakePHP by its simplicity. Other languages like Python with Django and Flask or Ruby On Rails have their own mini scaffolding.
A little Terminology
Actually, the last version of CakePHP doesn’t support Scaffolding, they remove it in the 2.5 version (actually the last version of CakePHP is 3.3).
Before to begin I want to explain some of the vocabularies here:
- CRUD: means CReate Update Delete. Actually when developers talk about CRUD refer to the pages needed to list records from a database, form to create new records and form to update records.
- Scaffolding: Technique that creates CRUD list and forms on the fly and shows it.
Ok, continue explaining the difference between the two main techniques regarding this. The best of both is CRUD generation. CRUD Generation executes one code that explores the database and generates the PHP files needed to access a database. Scaffolding does something similar, explores database and create CRUD on the fly. This is the reason that needs a lot of resources.
If you have a consistent database and don’t need to change anything I recommend that you use some of the CRUD generators. Two of the best for me:
We need Data
Now I want to begin our amazing scaffolding project. First of all, I need to create a database. I will begin to create 2 tables. One of the articles and others from categories of articles. Something simple.
I followed the model convention name of CakePHP:
https://book.cakephp.org/2.0/en/getting-started/cakephp-conventions.html#model-and-database-conventions
I don’t want to enter to explain databases, I suppose that you can figure out how to create your own database and tables and connect to a server. Anyway, here the structure:
|
1 2 3 4 5 6 7 8 9 10 11 12 13 14 15 16 17 18 19 20 21 22 23 24 25 26 27 28 29 30 31 32 33 34 35 36 37 38 |
CREATE TABLE `Categories` ( `id` int(11) unsigned NOT NULL AUTO_INCREMENT, `name` varchar(100) DEFAULT NULL, `active` tinyint(1) DEFAULT NULL, PRIMARY KEY (`id`) ) ENGINE=InnoDB DEFAULT CHARSET=utf8mb4; INSERT INTO `Categories` (`id`, `name`, `active`) VALUES (1,'Category 1',1), (2,'Category 2',1), (3,'Category 3',0), (4,'Category 4',1); CREATE TABLE `Articles` ( `id` int(11) unsigned NOT NULL AUTO_INCREMENT, `name` varchar(100) NOT NULL DEFAULT '', `price` decimal(9,2) NOT NULL, `active` tinyint(1) NOT NULL, `stock` int(11) NOT NULL, `category_id` int(11) unsigned NOT NULL, PRIMARY KEY (`id`), KEY `category_id` (`category_id`), CONSTRAINT `Articles_ibfk_1` FOREIGN KEY (`category_id`) REFERENCES `Categories` (`id`) ) ENGINE=InnoDB DEFAULT CHARSET=utf8mb4; INSERT INTO `Articles` (`id`, `name`, `price`, `active`, `stock`, `category_id`) VALUES (1,'Art 1',10.00,1,5,1), (2,'Art 2',10.00,1,5,1), (3,'Art 3',10.00,1,5,2), (4,'Art 4',10.00,1,0,2), (5,'Art 5',10.00,1,5,3), (6,'Art 6',10.00,0,5,4), (7,'Art 7',10.00,1,5,4), (8,'Art 8',10.00,1,5,4), (9,'Art 9',10.00,1,5,4); |
Install Cake
It’s time to install CakePHP. You can choose to download or use git. I prefer git but maybe you want to download:
Git
I create a directory and enter it and clone:
|
1 2 3 4 5 6 7 8 9 10 11 12 13 14 15 16 17 18 19 20 |
$ mkdir scaffolding $ cd scaffolding $ git clone -b '2.4.9' --single-branch https://github.com/cakephp/cakephp.git . Clonar en <<.>>... remote: Counting objects: 180322, done. remote: Compressing objects: 100% (102/102), done. remote: Total 180322 (delta 17), reused 99 (delta 14), pack-reused 180206 Receiving objects: 100% (180322/180322), 28.16 MiB | 3.22 MiB/s, done. Resolving deltas: 100% (136504/136504), done. Checking connectivity... hecho. Note: checking out '4b5e3c176ece9ddab5ac438cfba0bdcdd0d3ab9e'. You are in 'detached HEAD' state. You can look around, make experimental changes and commit them, and you can discard any commits you make in this state without impacting any branches by performing another checkout. If you want to create a new branch to retain commits you create, you may do so (now or later) by using -b with the checkout command again. Example: git checkout -b <new-branch-name> |
With -b ‘2.4.9’ in clone, we are telling that only want this branch or tag. If you look VERSION.txt of CakePHP you can see version:
|
1 2 3 4 5 6 7 8 9 10 11 12 13 14 15 16 17 18 19 20 21 |
# cat lib/Cake/VERSION.txt //////////////////////////////////////////////////////////////////////////////////////////////////// // +--------------------------------------------------------------------------------------------+ // // CakePHP Version // // Holds a static string representing the current version of CakePHP // // CakePHP(tm) : Rapid Development Framework (https://cakephp.org) // Copyright (c) Cake Software Foundation, Inc. (https://cakefoundation.org) // // Licensed under The MIT License // Redistributions of files must retain the above copyright notice. // // @copyright Copyright (c) Cake Software Foundation, Inc. (https://cakefoundation.org) // @link https://cakephp.org // @package Cake // @since CakePHP(tm) v 0.2.9 // @license https://www.opensource.org/licenses/mit-license.php MIT License // +--------------------------------------------------------------------------------------------+ // //////////////////////////////////////////////////////////////////////////////////////////////////// 2.4.9 |
Download
You also can download it directly from GitHub. Follow the next link and click the green button called Clone Or Download and then click Download ZIP. Decompress the file in a directory and continue.
Try It
If you are using Apache in your environment, all works fine and you halt next step.
NGINX
In another hand, if you work with nginx you need to configure your server to make a good environment for CakePHP. Follow instructions in CakePHP Cookbook:
Trying
Then, if you load now your CakePHP URL you will see your first big-screen :)
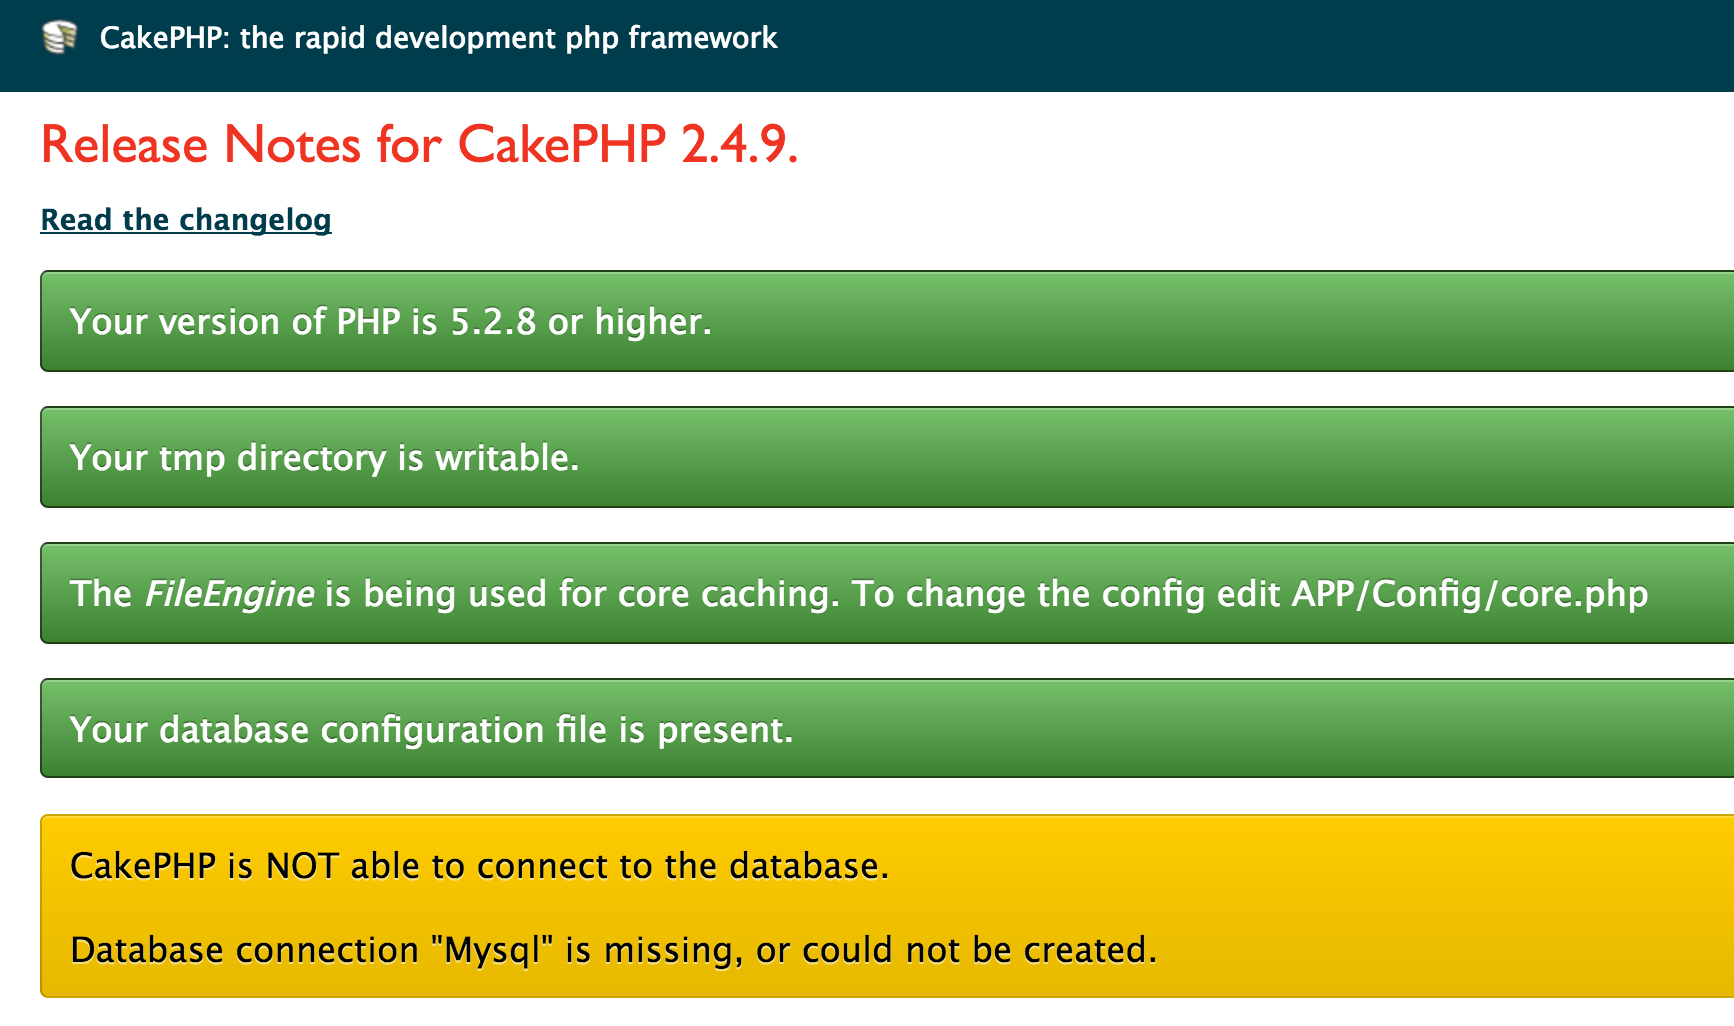
This is correct, CakePHP is telling us that all is correct but a database isn’t we need to write database config.
Configure Cake
First, we need to connect to a database. This means that we need to create a configuration file. We have one sample file in:
|
1 |
app/Config/database.php.Default |
Rename it to
|
1 |
app/Config/database.php |
And open it, search for the next code and fill it with your data (is important that uncomment utf-8 if you use accents):
|
1 2 3 4 5 6 7 8 9 10 |
public $default = array( 'datasource' => 'Database/Mysql', 'persistent' => false, 'host' => 'localhost', 'login' => 'user', 'password' => 'password', 'database' => 'database_name', 'prefix' => '', //'encoding' => 'utf8', ); |
A configured database, the next step, begins the big and complex scaffolding code.
Creating Models
Now it’s time to create the models’ files to tell CakePHP what tables are involved. Create a file:
|
1 |
app/Model/Category.php |
And write (or paste) the next code:
|
1 2 3 4 5 6 |
<?php App::uses('AppModel', 'Model'); class Category extends AppModel { public $name = 'Category'; } |
Save it and do the same with Articles:
|
1 |
app/Model/Article.php |
And code:
|
1 2 3 4 5 6 |
<?php App::uses('AppModel', 'Model'); class Article extends AppModel { public $name = 'Article'; } |
It’s done, we have models.
Creating Controllers
It’s time to create Controllers. Controllers are files that control the execution of an application and ask models for data and send to views. In CakePHP also are mapped to URLs. If you want to access to domain.tld/products you need to create a ProductsController. In our case, I want two URLs, one for Articles and the other for Categories. Create file:
|
1 |
app/Controller/ArticleController.php |
And now the most complex and difficult to read code:
|
1 2 3 4 5 6 |
<?php class ArticlesController extends AppController { public $scaffold; } |
The property $scaffold is the most important, tell CakePHP that this controller is a Scaffolding controller.
Now for categories:
|
1 |
app/Controller/CategoriesController.php |
and code:
|
1 2 3 4 5 6 |
<?php class CategoriesController extends AppController { public $scaffold; } |
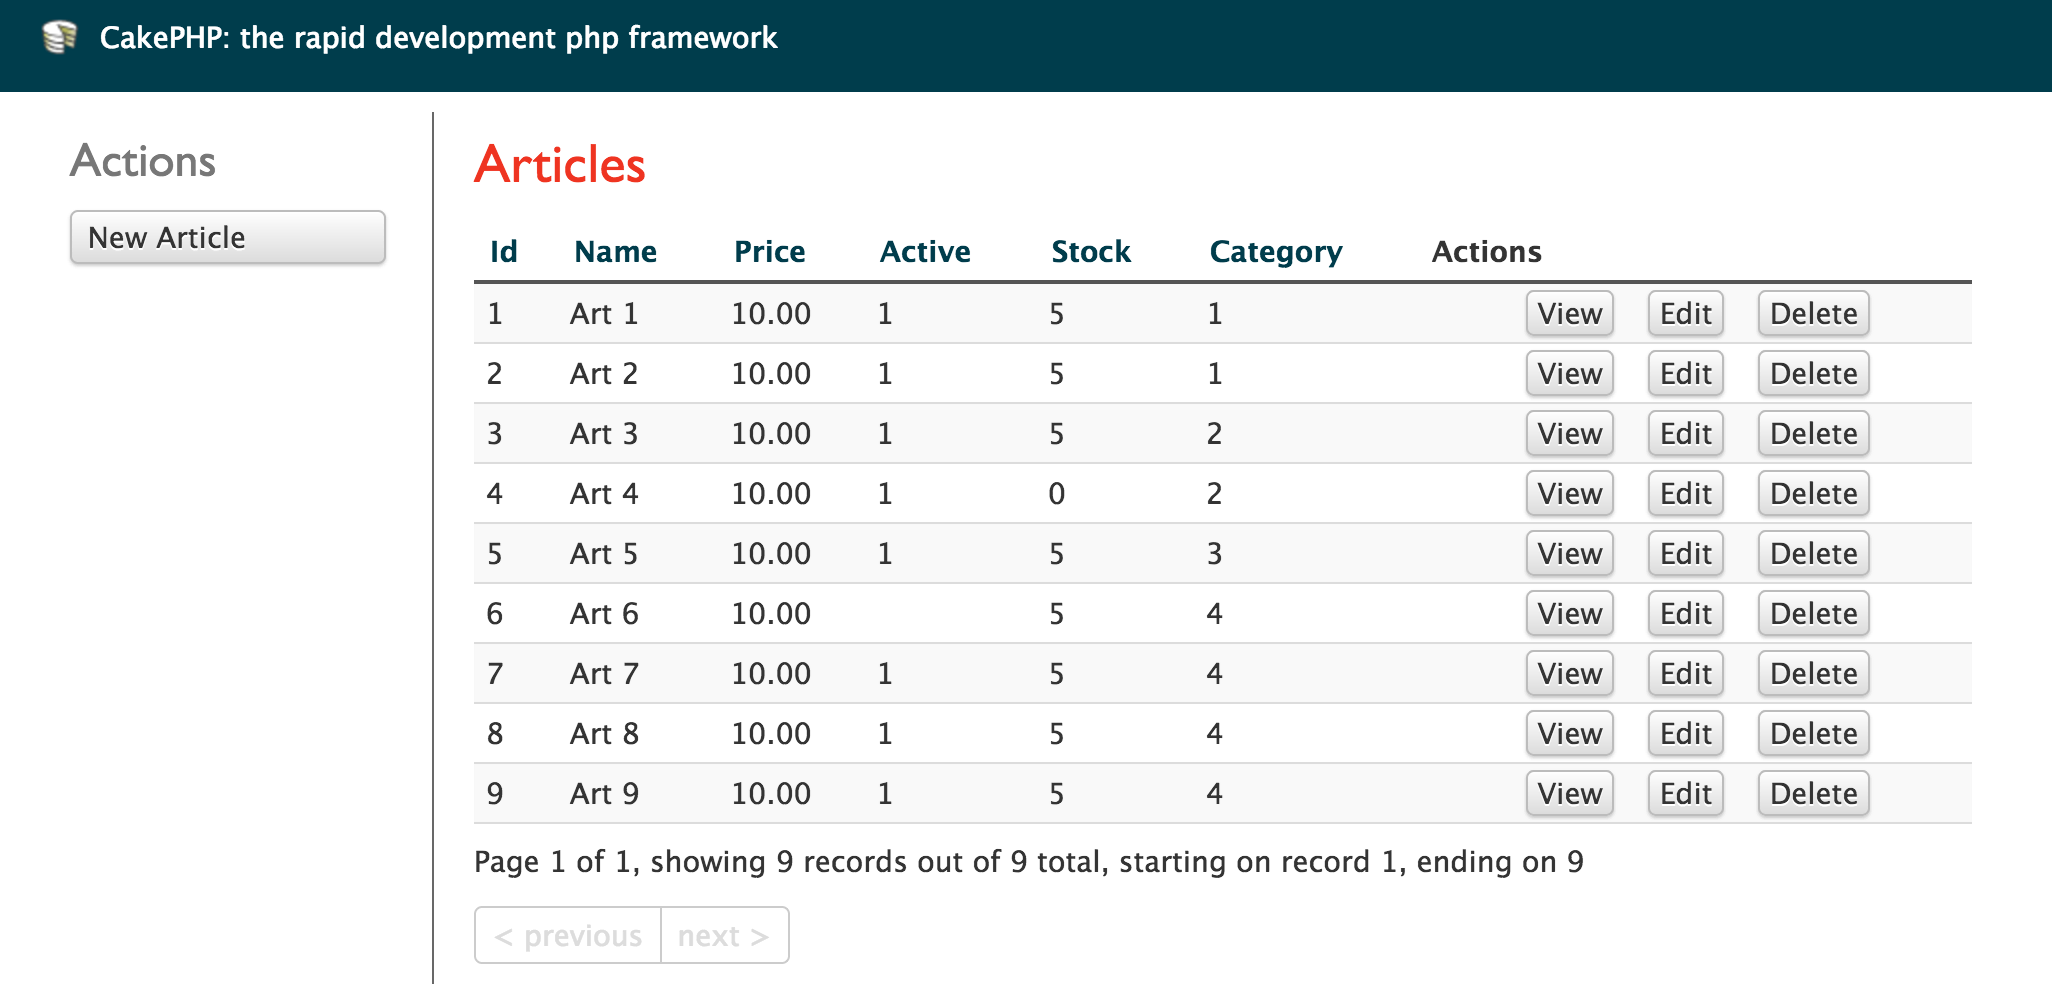
It’s done. Scaffolding it’s working. You need to access the domain.tld/articles and CakePHP does the work for you, scaffolding in action.
Scaffolding
Scaffolding List:
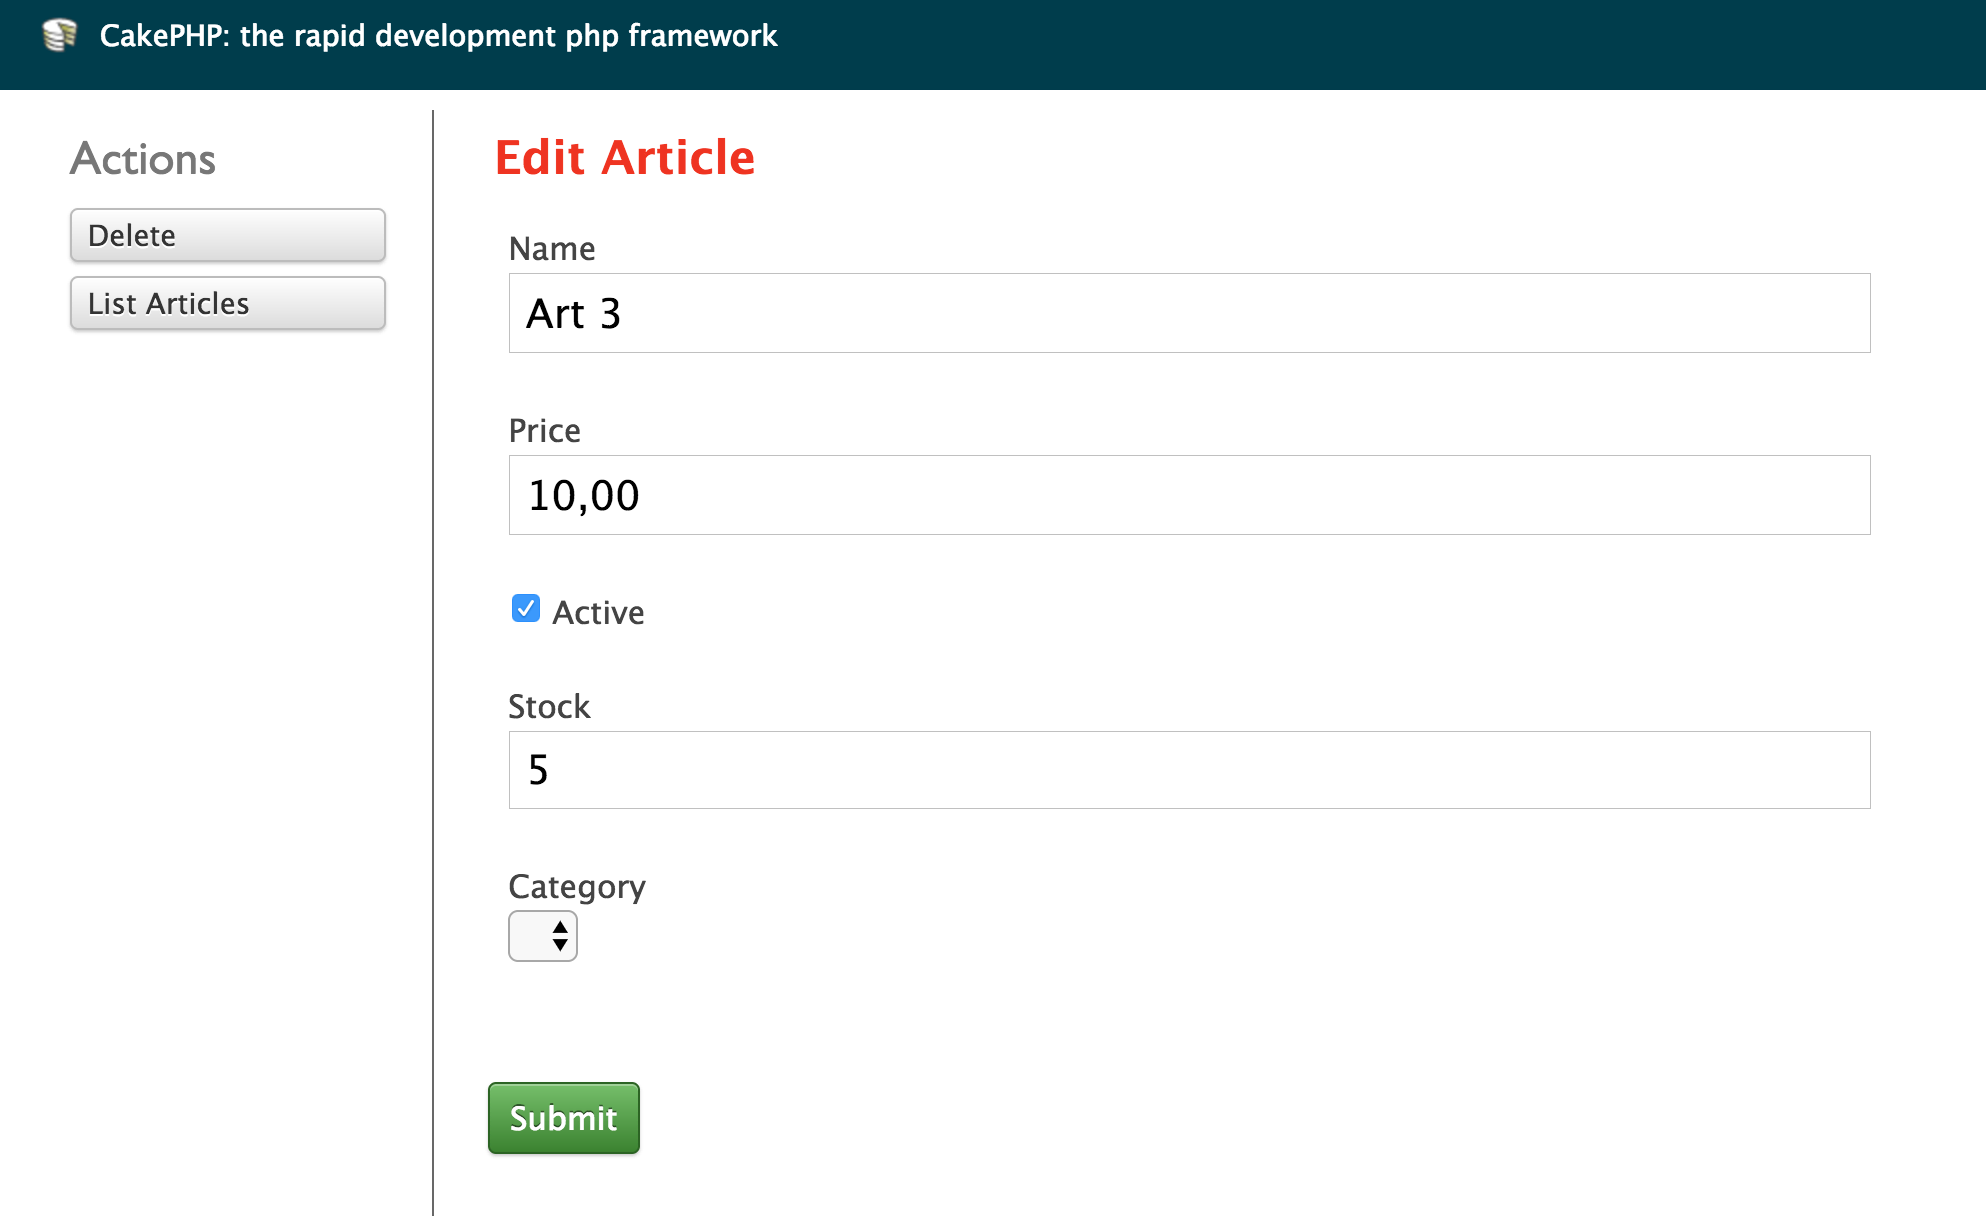
Scaffolding Edit:
You can browse for categories in the domain.tld/categories
Improvements
If you browse a little bit, you notice that category isn’t shown in Articles Scaffolding, only show ids. This is because the models need to know the relations between tables. Only change models to:
|
1 2 3 4 5 6 7 |
<?php App::uses('AppModel', 'Model'); class Article extends AppModel { public $name = 'Article'; public $belongsTo = 'Category'; } |
|
1 2 3 4 5 6 7 |
<?php App::uses('AppModel', 'Model'); class Category extends AppModel { public $name = 'Category'; public $hasMany = 'Article'; } |
With $belongsTo and $hasMany properties, we tell to Cake the relation with tables. Remember that if you don’t follow conventions this relation won’t work. In Articles is important the existence of category_id, with another name the relation will be more complex. You can see relations here:
Finally, I show you how can use Scaffolding with CakePHP. But remember that this is hard work for servers if you use a lot of tables and users, and is better to use CRUD instead.
In 2016, Betahaus asked us to develop a basic Workshop on WordPress to teach members about coworking. The movement was called “Members teach Members”. In this scenario, Víctor Santacreu prepared a workshop defined in two masterclasses: 2 days, four hours by day. The workshop is divided into 25% theory and 75% of practice. 34 students.
We prepared a presentation divided into two days.
The skeleton was:
- What is WordPress and what is it for?
- Features
- Installation environment
- Download and Configuration of a theme. What is a theme?
- What is a plugin
- Widgets: what are and their function
- Navigation menus
- Pages, Posts, differences between them – also categories and tags-
- Shortcodes: what are and examples
- User management and roles
- Creation of forms: using a plugin
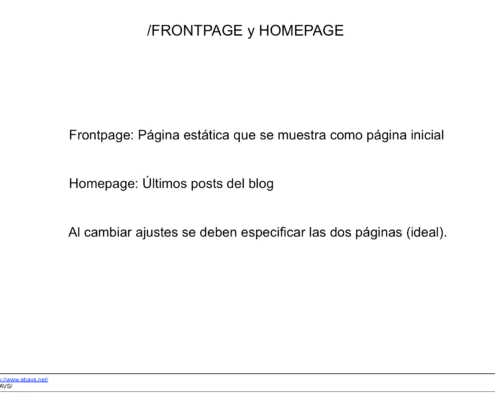
- FrontPage / HomePage: the difference between them and what is for
- Improve performance: cache plugin and technical explanation
- Web upload to production
On the first day of the workshop, we taught the first 9 points.
The students are interested in How to install WordPress, what are the differences between posts and pages? We learned a lot about themes, installed one and configured it. We explained what and why plugins are important and also a little bit of the history of WordPress.
The elementals concepts of this class: WordPress, posts, pages, categories, tags, plugins, widgets.
Historia de wordpress @betahausbcn con @morktadela pic.twitter.com/t3waFr6keR
— Ebavs (@ebavs) October 5, 2016
The second day was a little more complex and difficult.
We explained what’s the difference between Homepage and Frontpage, configure both of them and put it online altogether. We continue on the basis of caching and why is good how to measure page speed and we see a difference between load page without cache and with a cache.
Cache speed wordpress by @morktadela at @betahausbcn pic.twitter.com/2YhcbdU3Rx
— Ebavs (@ebavs) October 6, 2016
Finally, we move our project to production: migration BBDD, upload to real.
Thanks a lot for this opportunity Betahaus, was really amazing to teach people and learn from them.
Git is a powerful tool that can help to manage code. But sometimes we don’t know or we are scared about the features aren’t know. At least is our code and don’t want to lose any line of them.
Following the previous git post: Basic Git commands, we talk about branches.
The branch is a powerful feature of git. If like we copy all code to a new directory and begin work there. But the main difference is that git knows how to join or merge these two directories without broke or lose any line of code and all in the same directory ;)
Then, we want to show how to manage branches and easiest that is.
First of all, we need to make a dir and init a new repository:
|
1 2 3 4 |
$ mkdir ebavs-git-test $ cd ebavs-git-test $ git init Initialized empty Git repository in /var/sites/ebavs-git-test/.git/ |
Now it’s time to create some code:
|
1 2 3 4 5 6 7 8 |
$ echo "<?php echo 'hello';" > hello.php $ cat hello.php <?php echo 'hello'; $ git add . #adding files to repo $ git commit -a -m "say hello" [master (root-commit) 117a36c] say hello 1 file changed, 1 insertion(+) create mode 100644 hello.php |
It’s time to see branches and create new ones:
|
1 2 3 4 5 6 7 |
$ git branch * master $ git checkout -b second #create branch named second Switched to a new branch 'second' $ git branch # list branch master * second |
Now we have two branches. Made some changes to hello.php, and test what happened:
|
1 2 3 4 5 6 7 |
$ echo "echo 'say good bye';" >> hello.php #adding code $ cat hello.php <?php echo 'hello'; echo 'say good bye'; $ git commit -a -m "say bye" # commit changes [second be2743e] say bye 1 file changed, 1 insertion(+) |
Time to see differences:
|
1 2 3 4 5 6 7 8 9 10 |
$ git branch # list branch master * second $ cat hello.php # content of hello.php <?php echo 'hello'; echo 'say good bye'; $ git checkout master # change branch Switched to branch 'master' $ cat hello.php # content of hello.php <?php echo 'hello'; |
We are in master and time to merge branches, now we say: merge second into master:
|
1 2 3 4 5 6 7 8 |
$ git merge second # merge two branch Updating 117a36c..be2743e Fast-forward hello.php | 1 + 1 file changed, 1 insertion(+) $ cat hello.php # see what happenned <?php echo 'hello'; echo 'say good bye'; |
Merge two branches we don’t need the second branch, time to remove:
|
1 2 3 4 |
$ git branch -d second #remove branch Deleted branch second (was be2743e). $ git branch * master |
This kind of work with git gives us the opportunity to work in different code branch with different features, it’s like work in different directories without worry about mix code later.